Autumn Harvest Fruit Tart
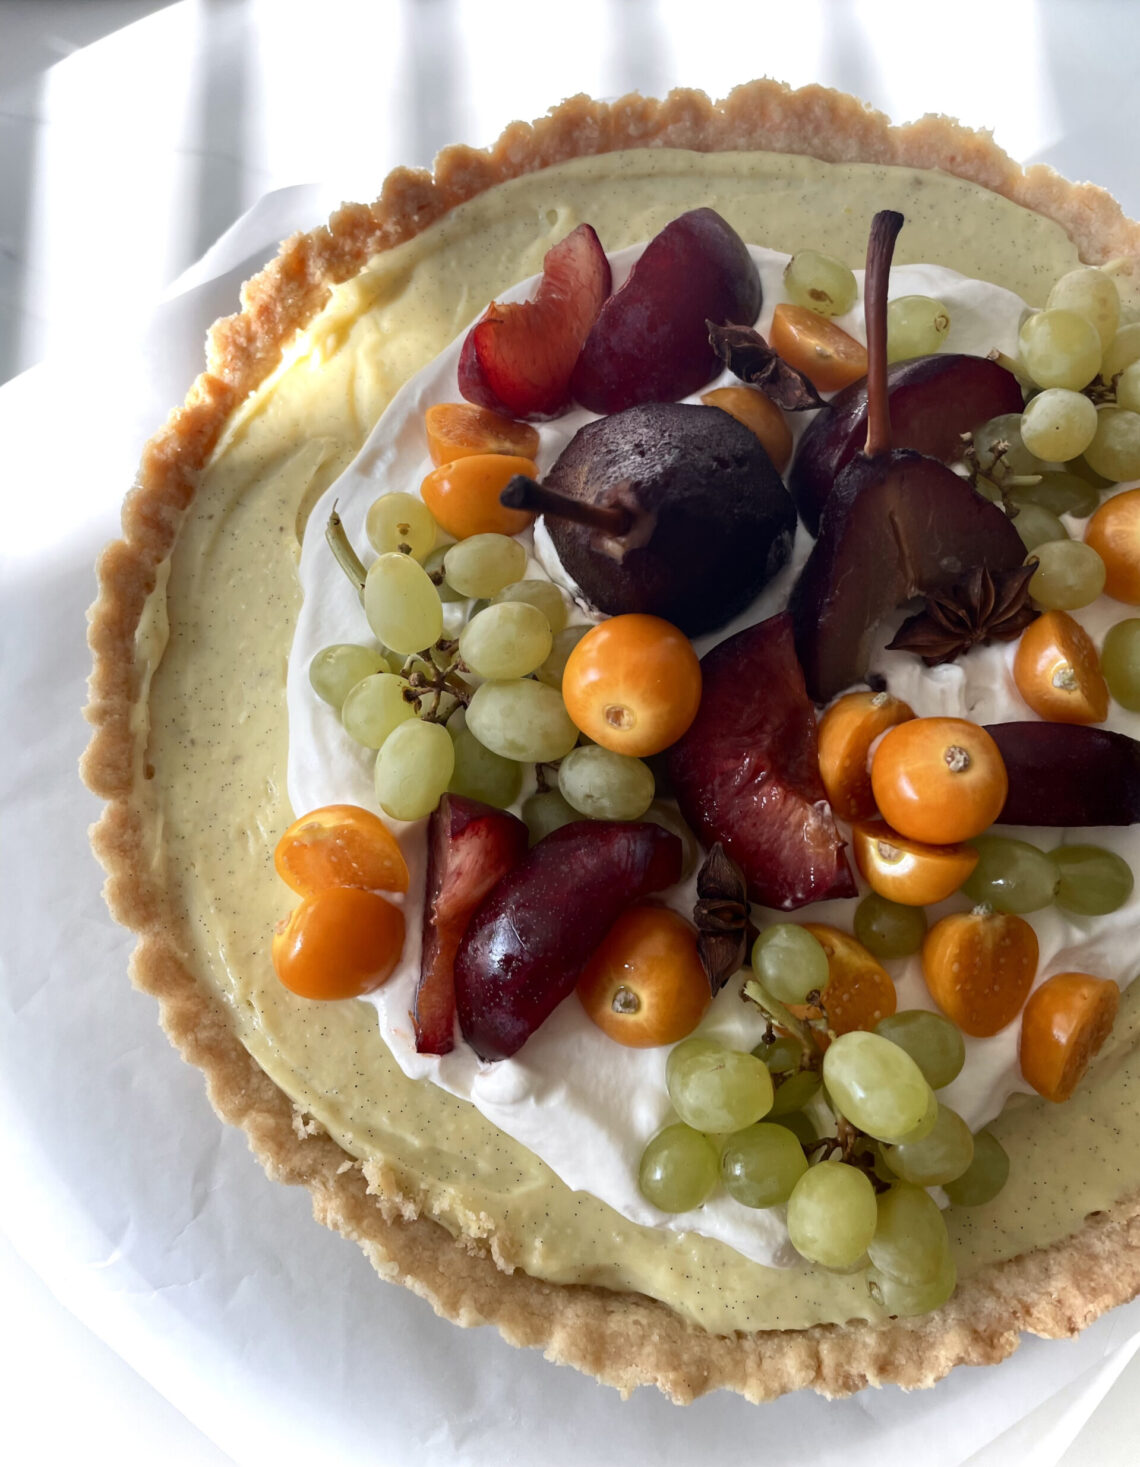
As the crisp air settles in and the leaves turn to shades of red, orange, and gold, it’s clear that fall is officially upon us. And what better way to celebrate the season than by indulging in a dessert that captures the essence of autumn’s harvest? This seasonal fruit tart does just that, with a rich, buttery shortbread crust, a thick and luscious pastry cream, and a medley of beautiful fall-colored fruits. If you’re ready to bring a bit of elegance and warmth to your table, read on to see how I crafted this delicious fall dessert.
A Twist on Tradition: The Shortbread Crust
I’m a big fan of putting a twist on the traditional, and for this tart, I steered away from the classic French tart crust. Instead, I opted for a rich and buttery shortbread crust with a slight touch of salt to complement the sweetness of the filling. The crust is twice-baked for that perfect combination of crisp edges and a melt-in-your-mouth center. Simply press the dough into your tart pan and let it bake to golden perfection.
Infused with Flavor: Red Wine Poached Pears
For the fruit, I wanted to elevate the flavors by poaching pears in red wine. This step brings out their natural sweetness and gives them a deep, autumnal flavor that’s irresistible. I simmered the pears in a mixture of red wine, dark fruit juices, and a blend of fall spices like cinnamon, cloves, and star anise. As the pears steeped, their flavors melded together, resulting in tender, spiced fruit that’s perfect for the tart.
The Creamy Center: Thick Vanilla Pastry Cream
While the pears absorbed all those wonderful flavors, I set out to make the pastry cream. I infused it with fresh vanilla bean for an extra touch of luxury, resulting in a thick and luscious filling that pairs beautifully with the buttery shortbread. If your pastry cream ends up thicker than you’d like, don’t worry—it’s an easy fix! Just whisk in a little extra milk until it reaches the desired consistency.
The Finishing Touches: Whipped Cream and Fresh Fruit
No tart is complete without a dollop of freshly whipped cream. Once you try making homemade whipped cream, you’ll never go back to the store-bought variety; it’s light, fluffy, and adds just the right amount of richness. After layering the tart with the pastry cream, I arranged the red wine poached pears, plums, green grapes, and some tart gooseberries on top. The combination of colors and flavors truly captures the spirit of the season.
To fill in any gaps and add even more variety, I added a few extra pieces of fruit. Honestly, the beauty of this tart is that you can use whatever seasonal fruits you have on hand. Apples, figs, or even pomegranate seeds would make wonderful additions, adding bursts of color and flavor.
Bringing It All Together
Once everything was assembled, the result was a stunning autumn tart that not only looks gorgeous but tastes like fall on a plate. The buttery shortbread crust provides a perfect base for the creamy filling, while the poached fruits add warmth and a hint of spice to every bite. Serve it with an extra spoonful of whipped cream on the side, and you’ll have a dessert that’s guaranteed to impress.
This tart is perfect for special gatherings, or simply as a treat to savor on a quiet afternoon with a warm cup of tea. It’s a celebration of the season’s best flavors, all wrapped up in a decadent and delightful dessert. So, if you’re looking to embrace the flavors of fall, give this recipe a try—you won’t be disappointed!
The day would not be complete with a visit from my favorite squirrel Rico Suave. I hope you enjoy this tart as much as Rico enjoy his walnuts!
Red Wine Poached Pears Recipe
Ingredients:
- 4-8 ripe but firm pears (Bosc or Anjou work well), peeled, with stems intact
- 1 bottle of red wine (such as a Malbec, Merlot, Cabernet Sauvignon)
- 1/2 cup sugar
- 1/2 cup dark fruit juice (such as pomegranate or blackcurrant juice)
- 1 cinnamon stick
- 2-3 whole cloves
- 1 star anise
- 1 vanilla bean, split lengthwise (optional)
- Zest of 1 orange
Instructions:
Prepare the Poaching Liquid: In a large saucepan, combine the red wine, water, sugar, dark fruit juice, cinnamon stick, cloves, star anise, vanilla bean (if using), and orange zest. Stir to dissolve the sugar and bring the mixture to a simmer over medium heat.
Add the Pears: Place the peeled pears into the poaching liquid. The liquid should cover the pears; if not, add a bit more water. Do not cover your pears.
Poach the Pears: Simmer the pears gently for about 20-30 minutes, turning them occasionally to ensure they cook evenly. The pears are done when they are tender and can be easily pierced with a knife.
Cool and Infuse: Remove the saucepan from heat and let the pears cool in the poaching liquid. This allows the flavors to infuse further.
Serve: Before serving, you can reduce the poaching liquid to a syrup by simmering it until it thickens. Serve the pears whole or halved, drizzled with the syrup, or use them to top a tart.
Shortbread Tart Crust Recipe
Ingredients:
- 2 cups all-purpose flour
- 1/2 cup granulated sugar
- 1 1/4 cups salted butter, cold and cut into small cubes
Instructions:
- Preheat the Oven: Preheat your oven to 325°F
- Mix Dry Ingredients: In a large bowl combine the flour and sugar.
- Cut in the Butter: Add the cold, cubed butter to the flour mixture. Using a pastry cutter or your fingers, cut the butter into the flour mixture until it resembles coarse crumbs. If using, add the vanilla extract and mix until the dough starts to come together.
- Press the Dough Into the Tart Pan: Transfer the dough into a 9-inch tart pan with a removable bottom. Press the dough evenly into the bottom and up the sides of the pan.
- Prick the Dough and Chill: Use a fork to prick the bottom of the crust to prevent it from puffing up while baking. Place the crust in the refrigerator for about 15-20 minutes to chill.
- Bake the Crust: Once chilled, bake the crust for 20-25 minutes, or until the edges are golden brown. If the center starts to puff up during baking, gently press it down with the back of a spoon. I sometimes use the bottom of a glass to smooth out the shape while it’s cooling.
- Cool Completely: Allow the crust to cool completely before adding the filling.
Pastry Cream Recipe
Ingredients:
- 2 cups whole milk
- 1/2 cup granulated sugar
- 6 egg yolks
- 4 tablespoons cornstarch
- 1 vanilla bean, split and seeds scraped (or 1 teaspoon vanilla extract)
- Pinch of salt
Instructions:
In a bowl of an electric mixer with the whisk attachment add the egg yolks, sugar, cornstarch, vanilla and salt and beat the mixture on high until light and fluffy.
In a saucepan bring the milk to a rolling boil.
Reduce the speed of the egg mixture and slowly start to add the milk mixture to slowly temper the eggs. Be careful not to add the hot liquid too quickly. After everything is throughly incorporated, transfer the mixer to a clean saucepan.
On medium heat you are going to vigorously whisk the mixture together until it thickens. Do not stop mixing as this will happen rather quickly. Once the pastry cream is thickened take it off the stove and if needed you can strain in through a sieve if you have some lumpy bits.
Mine did come out a little too thick, but I just whisked in a bit more milk and got it to my preferred consistency. It should be the consistency of mayonnaise.
Put in a clean bowl and cover with plastic wrap so that the plastic is completely touching the cream or it will develop a film. Allow to cool. Stores in the fridge for 2 days.
Homemade Whipped Cream Recipe
Ingredients:
- 1 cup (240 ml) heavy whipping cream, cold
- 2 tablespoons powdered sugar (or to taste)
- 1 teaspoon vanilla extract (optional)
Instructions:
- Chill the Bowl and Whisk: For the best results, place the mixing bowl and whisk (or beaters) in the freezer for about 10-15 minutes. Cold equipment helps the cream whip more easily.
- Whip the Cream: Pour the cold heavy whipping cream into the chilled bowl. Using a hand mixer or stand mixer on medium-high speed, start whipping the cream.
- Add Sugar and Vanilla: As the cream begins to thicken, add the powdered sugar and vanilla extract, if using. Continue whipping.
- Watch for Stiff Peaks: Keep whipping until the cream forms stiff peaks. This means that when you lift the whisk or beaters, the cream holds its shape firmly.
- Serve Immediately: Use the whipped cream right away for the best texture, or store it in the refrigerator for up to 24 hours.


